Worldpay iframe Guide #
참고용 Worldpay 가이드 Url :
https://developer.worldpay.com/products/hosted-payment-pages/iframe
Store 구현 설명 #
- Worldpay Embedded Integration JS 로드
- iframe이 랜더링될 container 요소 생성
- WPCL.Library().setup() 호출로 iframe 주입
- resultCallback()을 이용한 결제 결과 처리
| 항목 | 설명 |
|---|---|
url | 가장 중요 Store 서버가 Worldpay API를 통해 생성한 HPP Session URL |
target | iframe이 삽입될 div의 id |
language / country | 결제 UI 언어 및 국가 설정 |
successURL | 결제 성공 시 이동할 Store 페이지 |
cancelURL | 사용자가 결제를 취소한 경우 이동할 페이지 |
failureURL | 결제 실패 시 이동할 페이지 |
pendingURL | 결제 대기 상태일 경우 이동할 페이지 |
errorURL | 시스템 오류 발생 시 이동할 페이지 |
resultCallback | 결제 완료 후 Worldpay가 결과를 전달하는 콜백 함수 |
Store Iframe 적용 가이드 #
<head>
    <!-- Worldpay Embedded Integration JS (반드시 필요) -->
    <script src="https://payments.worldpay.com/resources/hpp/integrationshpp-embedded-integration-library.js"></script>
</head>

<body>
    <!-- Worldpay HPP iframe이 삽입될 영역 -->
    <div id="custom-html"></div>
    <script type="text/javascript">
        /*
         * Store는 아래 항목들에 실제 값을 넣어 사용하면 됩니다.
         *  - url: 우리 API 등을 통해 받은 Worldpay HPP URL(Session URL)
         *  - language / country: 옵션 (언어/국가)
         *  - successURL / cancelURL / failureURL / errorURL: Store 페이지 이동 경로
         */

        var customOptions = {
            url: "Worldpay HPP URL정보",
            //ex : "https://payments-test.worldpay.com/app/hpp/integration/wpg/corporate?OrderKey=LGETEST%5ETESTPG_20260324164825&Ticket=00177477050780902KHAr6MXsykGwgb8tRugqcw7lHa-FWuEDCxQWUd&source=https%3A%2F%2Fsecure-test.worldpay.com"
            type: "iframe",
            inject: "onload",
            target: "custom-html",
            accessibility: true,
            debug: false,
            language: "MY",
            country: "GB",
            successURL: "성공URL (Store 전용)",
            //ex : "https://qtkic-gpay.ebp.lgsmartplatform.com/ebp2/jsp/test_result_worldpay_s.jsp"
            cancelURL: "취소URL (Store 전용)",
            //ex : "https://qtkic-gpay.ebp.lgsmartplatform.com/ebp2/jsp/test_result_worldpay_f.jsp"
            failureURL: "실패URL (Store 전용)",
            //ex : "https://qtkic-gpay.ebp.lgsmartplatform.com/ebp2/jsp/test_result_worldpay_err.jsp"
            pendingURL: "대기URL (Store 전용)",
            //ex : "https://qtkic-gpay.ebp.lgsmartplatform.com/ebp2/jsp/test_result_worldpay_p.jsp"
            errorURL: "에러URL (Store 전용)",
            //ex : "https://qtkic-gpay.ebp.lgsmartplatform.com/ebp2/jsp/test_result_worldpay_err.jsp"

            // 결제 완료 후 콜백
            resultCallback: function (responseData) {
                var redirectUrl;
                var status = responseData.order.status;
                switch (status) {
                    case "success":
                        redirectUrl = "성공URL (Store 전용)";
                        //ex : "https://qtkic-gpay.ebp.lgsmartplatform.com/ebp2/jsp/test_result_worldpay_s.jsp"
                        break;
                    case "error":
                        redirectUrl = "에러URL (Store 전용)";
                        //ex : "https://qtkic-gpay.ebp.lgsmartplatform.com/ebp2/jsp/test_result_worldpay_err.jsp"
                        break;
                    default:
                        redirectUrl = "실패URL (Store 전용)";
                        //ex : "https://qtkic-gpay.ebp.lgsmartplatform.com/ebp2/jsp/test_result_worldpay_err.jsp"
                }
                window.location = redirectUrl;
            }
        };

        var libraryObject = new WPCL.Library();

        libraryObject.setup(customOptions);
    </script>

    </body>

    </html>
로고 적용 가이드 #
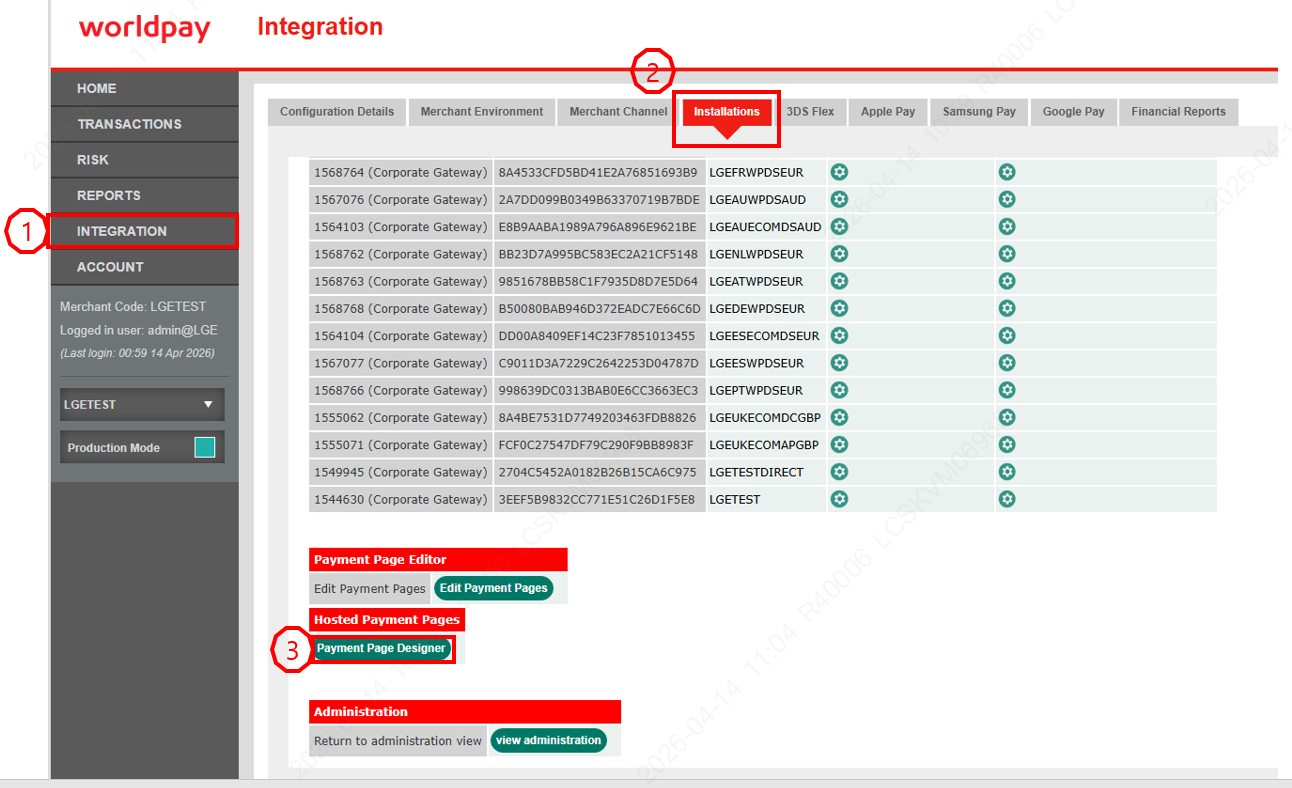
- worldPay admin 사이트(https://secure.worldpay.com/sso/public/auth/login.html) 접속 후 INTEGRATION 메뉴를 선택합니다.
- Installations 탭을 선택합니다.
- Payment Page Designer 버튼을 클릭하면 새창으로 HPP 수정창이 열립니다.
- 로고는 iframe 사용하여 결제 할 때는 보이지 않고, Pay By Link 통하여 직접 브라우저에서 결제창 호출 했을때만 표시됩니다.
- Logo 메뉴를 선택합니다.
- Browse Files 를 선택하여 원하는 로고를 업로드 합니다.
- 업로드 된 로고에서 원하는 로고를 선택합니다.
- 위와같이 반영된 로고를 확인 할 수 있습니다.
결제 페이지 적용 가이드 #
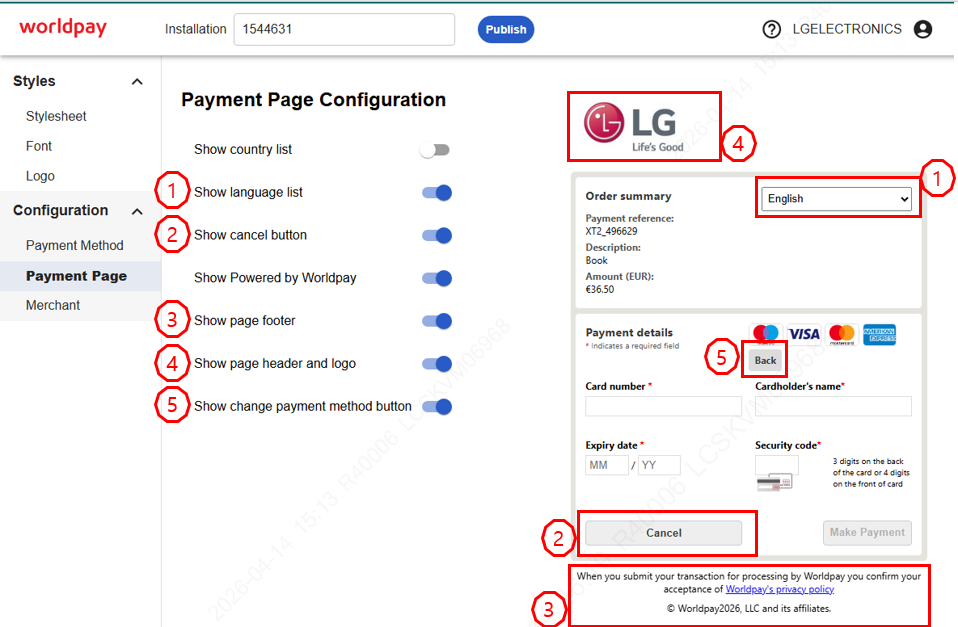
- 결제페이지에 노출되는 부분 수정 할 수 있습니다.
- 언어 선택 콤보박스를 활성화 시킵니다.
- 취소 버튼을 보여줍니다.
- footer 부분의 내용을 보여줍니다.
- 로고를 표시해줍니다.
- 결제종류 선택 버튼을 활성화합니다.
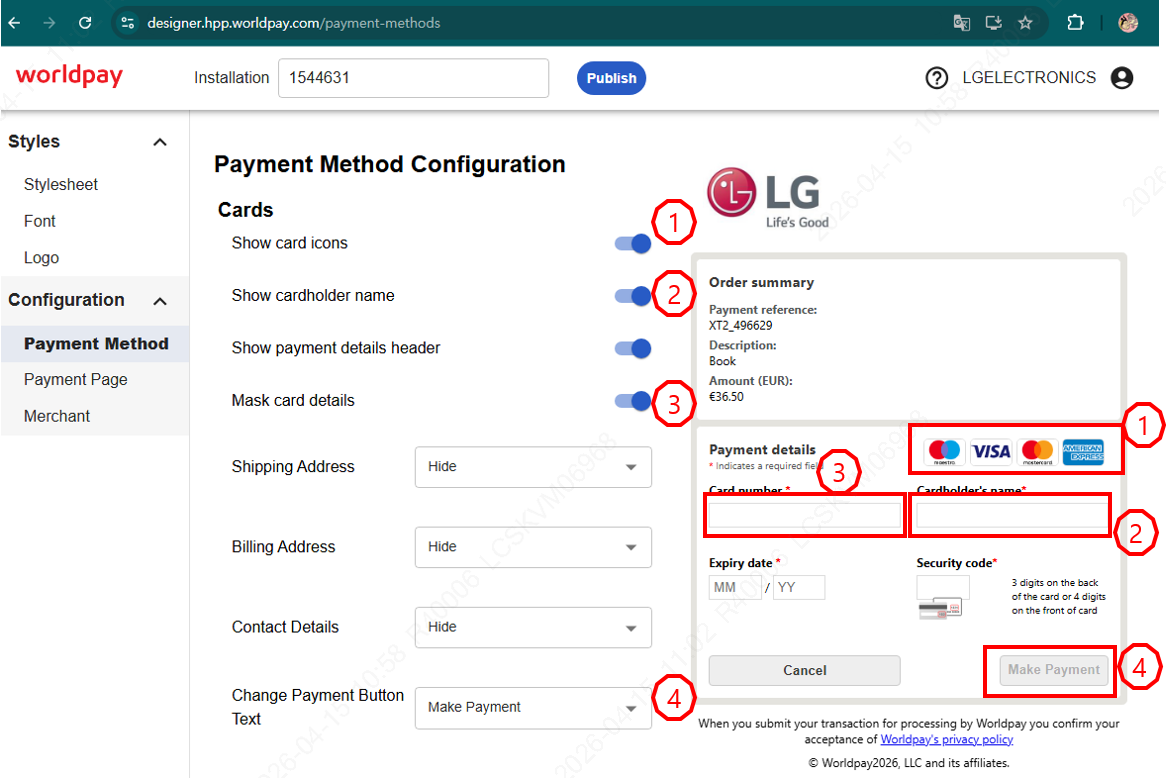
- 결제페이지의 디자인을 수정 할 수 있습니다.
- 카드 아이콘을 노출해줍니다. 해당 아이콘은 카드 bin 정보 입력 시 입력한 카드의 카드사를 보여줍니다.
- 카드 사용자명 입력란을 노출해줍니다.
- 카드번호를 마스킹 처리해줍니다.
- 결제요청 버튼의 메시지를 선택 할 수 있습니다. 선택 가능한 버튼 메시지 : Make Payment, Submit Payment, Buy Now, Pay Now, Pay, Save Account , Save Card, Save, Add, Add Card, Book Now, Continue, Place Order
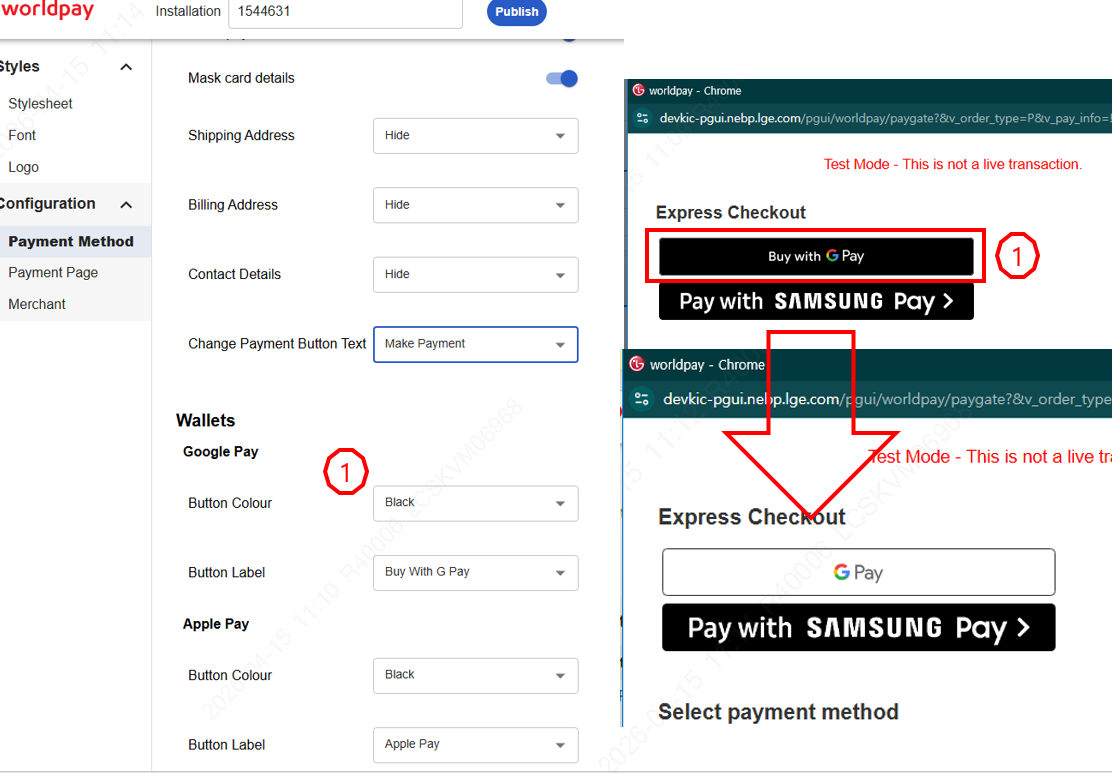
- Wallets 아이콘 정보를 변경 할 수 있습니다. - 위 사진을 변경 가능한 두 항목 모두 수정해본 결과 입니다.
- Button Color : 버튼색을 변경할 수 있습니다. 변경가능한 목록 : Black, White Button Label : 버튼문구를 변경 할 수 있습니다. 변경가능한 목록 : Buy with G Pay, G Pay